Hello everyone, I know it’s been awhile since my last post, and I apologize for being so inactive. Last week I started work again (I work as a swim instructor at a local pool), and then some other things came up and because everything was so new again, I did not know how to balance my week out, anyways I hope to get back into my routine of posting at least twice a week.
I hope you all are doing well, and since I have hardly posted this month, I just wanted to wish everyone a very happy Pride Month! For those of you who do not know, June is known as Pride month for all those who identify as LGBTQ+, and today I am showing my support for the community and well of course celebrating Pride! I’ve been wanting to do a Pride rainbow makeup look for quite awhile and since throughout the month of June, Pride fests and parades are happening all over the world, I thought I’d show you one makeup look to try out. I will be attending Chicago’s Pride Parade this upcoming weekend, and I’m planning to complete this same makeup the day of. Anyways I hope you all enjoy this look and maybe even try it out for yourself.
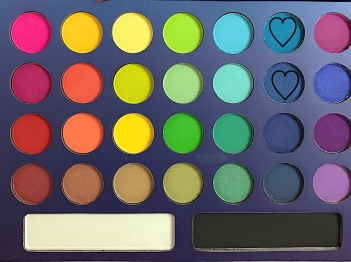
Starting off with the eyes of course, since it happens to be the main action of our look. I decided to mimic the Pride flag on my eyes, a rainbow transition from red, orange, and yellow on one eye and on the other, green, blue, and purple. For today’s look, I used the BH Cosmetics “Take me to Brazil” Palette and the Nyx Ultimate Eyeshadow Palette in “Brights”. I used a few different brushes, that I will mention in the process of this look.
Before starting this eye look, I did apply the Urban Decay Skin Concealer onto my eyelids using my Beauty Blender, and then setting my eyes with the shade “Peach Butter” from the Too Faced Peachy Mattes Palette, (You can use any light neutral shade).
The first color I begun with was the yellow color, I started off towards the inner corner of my eyes, building it into my crease. I used a mix of the two yellow shades in the TMTB palette, using a “Beau Gachis Tapered Blending Brush” that I received in my Ipsy bag a few months ago. (I probably had the most trouble with the yellow, the pigment really was not showing up for some reason, which why it took me a little longer).

The following color was the Orange that I used on the center of my lid, I used a blend of the orange from the TMTB palette and then the tangerine shade in the Nyx palette. To apply the orange, I used an It Cosmetics shadow brush, this is really good for picking up color. (Orange was the other color I struggled with for some reason, hopefully when I do this makeup look again, the color is more pigmented).
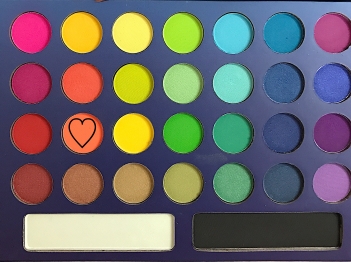
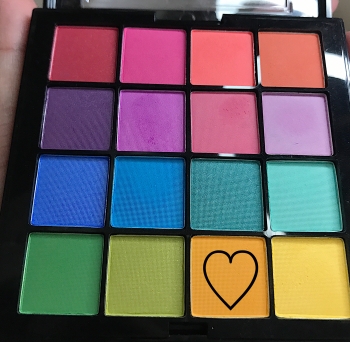
The last color used on this eye, was the Bright Red. This is where the pigmented really started to show up. There is only one matte Red shade in the TMTB palette, and to apply the color onto the outer corner of my eyes/crease, I happened to use the “It Cosmetics Precision Shadow Brush”, another brush I adore.
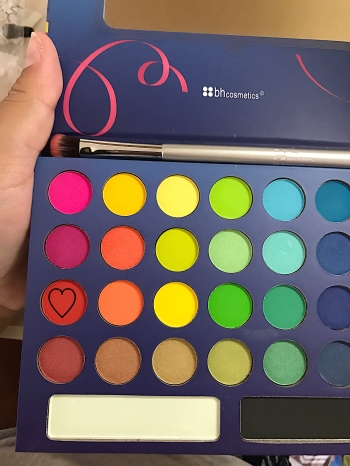
Once I had gotten all three colors onto my eye, I then blended them with the “BH Cosmetics V5 blending brush” to make sure that there was not any harsh lines and to give it an ombre effect. I also wanted to mention that if I use a repeated brush, I do clean it with the Vera Merona Mini Color Switch, to remove any of the previous colors.

Next up is my other eye, which holds the other three colors of the Pride flag. I went ahead with the Green first, starting in the inner corner of my left eye working it into the crease. The first green was from the TMTB palette and then the darker green was from the Nyx palette to begin the transition for the blue. To apply the green colors, I used this thin brush that I also received in my Ipsy bag a few months back, by SL Miss Glam.

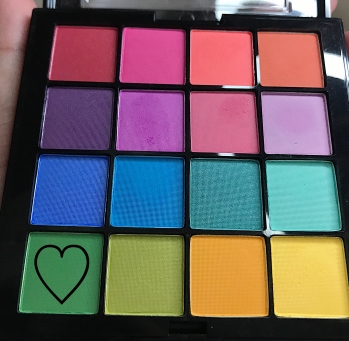
With my blue shades, I used the same brush when I did the Orange. I decided to start off with a turquoise like blue and then darken it up with a midnight blue color, as it would be transitioning to the purple.
Lastly, for my purple color, I kept it pretty simple and only used one color. Using my Wet n’ Wild Large Eyeshadow Brush. To compact and slightly smoke out the color.


That completes my eyeshadow look, and now onto the glitter magic. (I finished the rest of my face makeup before starting on the glitter). For highlight, I used the cream highlight stick by Milk Makeup in Techno, I know they were promoting this for Pride Month, so I am unsure if this is sold only for a limited time. Next, I applied the Nyx Glitter Primer with a little precise brush by Real Techniques, where I decided to primarily focus on the highs of my cheekbones. I applied the Nyx Crystal Glitter with the same brush and just compacted a bit onto the primer. I decided to keep it to a crescent shape.

Once I was done applying the glitter to both sides of my cheekbones, I finished off by highlighting areas of my face with the shade “Chehoo” from the Babe in Paradise Palette.

That completes the final Pride Makeup look. I am no MUA, but I was happy with the way everything turned out. I do hope that the colors come out more pigmented on the day of the Pride Parade and I will also be applying more Glitter than I did here. Hopefully you all enjoyed, and happy Pride! 🌈 I also wanted to say thank you to everyone who follows my blog, I hit 200+ followers!
If you enjoyed this post then do not forget to like it and please subscribe with your email in the sidebar, to be notified of new posts through your email, (be sure to confirm subscription in email). Also make sure to follow me on my social media pages down below, I will follow back all other fellow bloggers!
remember love always wins, ariana. 🌈 ♡🌈
Check out my last post: Smashbook with me: Seattle Edition!
Connect with me on my social media: Instagram//Facebook//VSCO//Poshmark//Buy Me A Coffee//


Very pretty! 😍
LikeLiked by 1 person
thank you 😊
LikeLike
Very cute!
LikeLiked by 1 person
thank you. ☺️
LikeLike
So beautiful!! I absolutely love the look! xx So vibrant and stunning! 💚
LikeLiked by 1 person
aww thank you so much Nunzia! It means a lot to me, I hope you try it out! 💜
LikeLiked by 1 person
you look gorgeous x x
LikeLiked by 1 person
thank you so much, you’re very kind. 💕
LikeLiked by 1 person
I love it!!! Everything looks so pretty!
LikeLiked by 1 person
thank you, that’s very sweet of you. 💕
LikeLike
Pls do my makeup!!! I love love love it!!!
LikeLiked by 1 person