Smashbook with me: Seattle Edition!

Hi everyone, I’m back with another creative blog post today. I apologize for not posting the other day, I had an advising appointment to pick out my classes for College. Anyways, today’s post will be a smashbook with me, if your unfamiliar with a smashbook, it’s a more creative/less organized version of a scrapbook. I’ve had this smashbook for about two years already, and I usually use this only for my vacations or major events. Today, I am going to smashbook my Seattle trip! I hope you all enjoy and get some ideas of creativity to try out.

Things you will need: 

  • A smashbook
  • Pictures (I recommend printing them out on paper for a smaller size).
  • Scissors and a glue stick
  • Travel souvenirs such as; (tickets, Polaroids, stickers, hotel keys, dried flowers, etc.)
  • Pens of your choice

Starting off, make sure you have everything you will need in order to start.

IMG-6384

IMG-6383

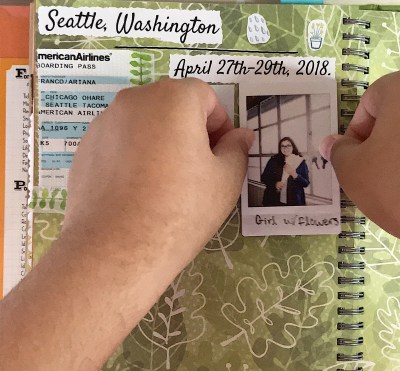
I started out by cutting out my Seattle header that I printed out on a piece of paper. I also used a fun print pair of scissors to give the words a cool look. Then I cut out any other pictures or words that I was planning on using.

IMG-6382

I then glued down a few pieces (a part of my boarding ticket) and started to have an idea on my layout. I added two cute plant stickers on top and then added a cute plant washi tape border around my boarding ticket.

IMG-6379

IMG-6380

I then taped down my Polaroid photo in a spot where I thought it fit well.

img-6381.jpg

I then thought of this cute idea to cut a lavender colored paint sample panel for this idea I had in mind to put my dried lavender onto.

IMG-6378

IMG-6386.JPG

Excuse the quality of the photo itself, it was zoomed in this photo, but I really loved the way it came out.

I then wrote “Emerald City” with a green marker to fill up some empty space. Unfortunately my handwriting is not the best, therefore I usually just type out what I want to see, but at least it gives my page some character.

IMG-6375

IMG-6377

I then taped my hotel room key slot onto my page in the corner, where I thought it fitted perfectly.

One of the last things, I did was cut a photo and use this pretty floral background out of a magazine to layer the photo onto, to give it dimension.

IMG-6376

I also forgot to mention, on the bottom of this page, I taped down my admission ticket from the Chihuly Garden & Glass Musuem. I added a few other smaller details, that I did not document and then came with my final product.

Here is the final product of my Seattle trip on my smashbook!

This slideshow requires JavaScript.

I am happy with the way it turned out, it’s not my best one, but I still love it! I had fun showing you all how I smashbook, and if you’d like to see more then do no not forget to like and follow my blog. In the future, I just may show you all the other ones I’ve done from previous trips. If you enjoyed this post then do not forget to like it and please subscribe with your email in the sidebar, to be notified of new posts through your email, (be sure to confirm subscription in email). Also make sure to follow me on my social media pages down below, I will follow back all other fellow bloggers!

until next time, ariana. 

Check out my last post: Unpopular Opinions/// Just for fun
Connect with me on my social media: Instagram//Facebook//VSCO//Poshmark//Buy Me A Coffee//

Art Journal with me: Collaging

Hello everyone, I hope your Monday is going well! I thought I would kick off the week, with something a little different and throw some creativity at you all! For today’s post I will be art journaling: Collaging edition. For the many of you who do not know, I am very creative if I do say so myself, and one of my absolute favorite art activities to do is, collaging. I got into collaging a few months ago and it is something that I never get sick of because there is always new inspiration out there. Collaging is amazing because you can use different types of media to create a collage, making it personal and unique to you. Throughout this post, I will be sharing some of my tips on how to start collaging and my collaging process for today’s collage.

  • Get Inspired//Find Inspiration:

Inspiration is everywhere around you, whether it’s in nature, on the internet, or in a physical item. In my personal opinion the best place to get inspiration from is either magazines or on pinterest. There is so much out there that will inspire you or call your attention. I love when I flip through a magazine and it’s almost like something is speaking to me on the page, so whether it is an image or words, I cut it out to use in a collage of mine.  

  • Finding a theme:

Okay so this one is not an essential, however I find that when establishing a theme for the collage, it will help you be on the lookout for images/words that correspond to your theme when looking for ideas. A theme could be a mood board, aesthetics, a color, or feelings. Do not discouraged if you cannot find a theme, because sometimes they will form later on or sometimes it is just what you find exhilarating.  

  • Using what you have:

The best thing about collages is that you do not have to go out and buy materials, you can easily use any of the supplies you have at home. Look through old magazines, if you have paint then add paint to your collage, if you have a printer then find images on the internet, go outside to get flowers and leaves, use buttons, tissue paper, or whatever materials your heart desires. Be imaginative and mix your supplies together to create your collage.

Things you will need:

  • An art Journal or paper
  • Scissors
  • A glue stick or mod podge
  • Inspiration & any kind of materials you want for your collage

IMG-1316

Okay so now onto my collaging process. I went to an art journaling class the other night and I was inspired to create a collage that had a blue color scheme, it went really well with the page in my journal and I thought why not try it. At home I gathered images and background colors through magazines, cutting them out, I also used different shades of blue tissue paper to layer my pictures on.

I gathered some magazines I got earlier this year to flip through, my scissors and my glue stick. Look for images that speak to you or call your attention and then cut away!

IMG-1317

Once you have a good amount of images to choose from, start forming how you want your collage to look.

IMG-1318 (1)

Start gluing random pieces on top of each other, for an overlapping messy look.

IMG-1321

If you notice any gaps or empty white spaces that are not covered, then simply get coloring materials (in this case I used pens and colored pencils, to color in the white spaces or you can choose to leave them, the choice is yours. IMG-1320

Once you are done, you will have your masterpiece. Collaging is just this great way to be inspired and to express yourself. I find it ultimately relaxing and a creative source for inspo. So the next time you are feeling artistic, gather some supplies and your journal, play some winter acoustic tunes on spotify, and let your mind take you to another place.

6AB13B67-76DF-472F-B964-862945DC6DC9
Final piece.

Let me know if you collage or plan on creating one to express yourself, I’d love to see it! If you found creative inspiration then please like this post! I will be posting a TMI tag earlier tomorrow, so keep an eye out for that. If you enjoyed this post then please subscribe with your email in the sidebar, to be notified of new posts through your email, (be sure to confirm subscription in email) also make sure to follow me on my social media pages, down below!

Much love, Ari.  

Check out my last post: Valentine’s Day Simple Glam Look | 2018
Connect with me on my social media: Instagram//Facebook//VSCO//Poshmark//Buy Me A Coffee//