Valentine’s Day Simple Glam Look | 2018

Hello beauties, Chicago’s currently having a snow day today, we are expected to have a foot of snow by tonight, I love snow so this is pretty great. Since there is a snow day today, I decided to take advantage of the day and work on today’s blog post and a few other ones! For today’s post I will be showing you a Simple Glam Valentine’s Day Makeup Look, (as a disclaimer I am not a makeup artist or anything, but I do love makeup and love to share my creativity with all of you). I hope this post gives you ideas for Valentine’s Day makeup, I kept today’s post shorter and I will also link down all the products I used down below.

Products Used:

05879D90-9C8F-41FB-AED9-45E744216289
Close-up of the Modern Renaissance.

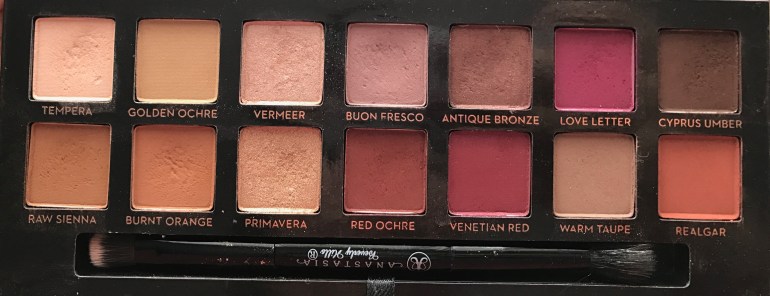
1st Step: To start off, I use the shade Buon Fresco as my transition color, using my Luxie 205 Tapered Blending brush. I blend the color to get a seamless base for my eyeshadow.

2nd Step: With the same brush I previously used before, I apply a bit of the color “Burnt Orange” into the crease.

3rd Step: With my Luxie 229 Tapered Blending brush, I apply the shade “Red Ochre” to the outermost and innermost parts of my crease, leaving the middle empty, doing this adds a bit of depth to my eyes.

4th Step: Taking my Wet n Wild Large shadow brush, I compact the shade “Love Letter”, on the center of my lid, working it into my crease. I make sure my lid is bright and fully covered. (The color really starts to pick up here).

5th Step: With the color “Venetian Red”, I use the Real Techniques Shading brush to apply along my lash line, slightly smoking it out, and to darken the outer corners of my eyes.

6th Step: Using “Venetian Red” again, I take my bh cosmetics V5 Blending brush to really blend out “Love Letter” and to make the shadow look seamless.

7th Step: Now for the shimmer, I use the dense side of the brush that comes with the Modern Renaissance and apply the color “Antique Bronze” first packing it onto the center of my lid, then taking “Vermeer” and doing the same thing, and lastly applying the shade under my brow bone to define it, and that completes the eye look!


For my face, I will not go into to much detail, since it is very similar to my Current Makeup Routine | Winter 2018, however for blush I decided to use the color “Breeze”  from the ABH Radiant Blush kit. For highlighter I used my mini Becca Rose Gold Highlighter and for my lips I used the Essence Prisma Glow Shine Lipgloss. A simple glam casual Valentine’s day makeup look.

IMG-1107
Here is the completed Makeup look. (excuse my hair, I am just staying home all day). The shimmer also does not show up very well in this photo, so my apologies.

I hope this look inspired you for Valentine’s Day makeup, and if it did then please do not forget to like. Comment down below what your plans are for Valentine’s Day! If you enjoyed this post then please subscribe with your email in the sidebar, to be notified of new posts through your email, (be sure to confirm subscription in email) also make sure to follow me on my social media pages, down below!

Much love, Ari. 💖 

Check out my last post: Yesto 3 Different types of Masks Review!
Connect with me on my social media: Instagram//VSCO//

Yesto 3 Different types of Masks Review!

Hello lovies, today’s post will be a review of three different types of masks by the brand Yesto. The masks are all different, from a clay mask, a sheet mask, and a multi mud mask! If you read my Beauty + Skincare Haul from last Thursday, then you would know that I happened to purchase two new Yesto masks. Yesto is a natural/cruelty-free/mostly vegan brand that sells skincare products. They are a high-end drugstore brand, but great quality, definitely one of my favorite skincare lines. Now onto my reviews of these Yesto masks!

#1 Yes to Cucumbers Calming Mud Mask

The first mask I used was the Yes to Cucumbers Calming Mud Mask (single use), made for sensitive skin with cool cucumbers and French green clay. So when I first opened the pouch, it had a strong cucumber scent, personally I liked it because it smelled very refreshing and the mask had a normal muddy clay consistency. It glided very smoothly onto my face with the application of my fingers, once I put it on I felt a slight tingle but I figured it was because my skin was dry from showering before, the tingle sensation went away in thirty seconds. I made sure that I had covered my faced completely and also some of my neck since there was a lot of product. The mask is to be kept on for between 5-10 minutes, I kept it on for 20 minutes though. The mask will dry onto your face like clay, however one thing I love that this mask does, compared to other masks is that it does not flake nor does it feel tight and dry. Towards the end of having the mask on I felt my skin feeling very calm with the mask. When I went to wash my face it felt great, like a facial massage mixed with the warm water you are cleaning your face with. I will say it did take a bit time to wash my face only cause when the mask is mixed with water it has a creamy feeling, which I do not mind. As soon as I had rinsed my face completely and pat dried it, my skin was feeling like 1000 bucks (cliche I know lol), very smooth, soft, and rejuvenated. The mask has a good portion in the package, definitely could work for two people. This was a high quality mask especially for the price of 3 dollars, you cannot beat that, so yes I would for sure repurchase again. Total Rating: 9.5/10 img-0996.jpg

#2 Yes to Carrots Nutrition Boosting vitamin-enriched kale Paper Mask

My second mask of choice was a sheet mask that is 100% vegan, Yes to Carrots Vitamin-enriched Kale Paper Mask.  This sheet mask is new to the Yesto brand, and claims it is made for depleted skin. The first thing I noticed of the mask was the scent, it definitely smelt vegan like a carrot kale green juice. The mask states that if it is tingling then it is working. The mask was tingling when I first applied it, feeling like a cotton sheet mask absorbing vitamins into your skin. The tingling was a bit strong at first and then it calmed down a bit during the process. The mask has flaps for you to put over your eyes if you choose to relax and close them, I thought that was pretty nice. I really felt the mask tingle on my checks, chin and upper lip, not really near the eyes or the forehead. After about 15 minutes of having the mask on my face, I removed it and softly splashed water onto my face to get rid of the excess mask-juice from my skin. I did notice my skin have a slight more of a glow from before, however my checks were a bit sensitive to this mask because my cheeks were a little redder than usual, I’m assuming the tingling of the product slightly irritated my skin. About three minutes after I took off the mask, my skin returned to its normal state. Overall my skin felt more smooth, slightly more radiant, and it was not oily from the mask which is a plus. I would probably/maybe repurchase again, but perhaps take off sooner since my cheeks were more sensitive. Total Rating: 6.8-7/10

Processed with VSCO with f2 preset

#3 Yes to Triple Masking 3 Mud Masks: Hydrate/Detox/Recharge 

The last mask I decided to use was the Yes to Triple Masking 3 Mud Masks: Hydrate/Detox/Recharge, it is a 3 in 1 face mask that uses coconuts to hydrate, charcoal to detoxify, and superblueberries/greek yogurt to recharge the skin. I first decided to apply the detox portion, where I applied the mask to my forehead and t-zone, It smelled very nice and felt good on my face. I then applied then the coconut mask onto my under eyes and upper lip for that hydration, of course I did not mind it because the mask smelled like coconut milk. During application of the coconut mask, I felt a slight sensation of a tingling feeling more than the detox. Lastly, I applied the blueberries recharging portion to my cheeks and over my upper lip to soothe the tingling from the coconut mask, the blueberry smelt like this delicious blueberry muffin ice cream I had over the summer. It was weird because I expected the others mask sections to tingle except the hydrating coconut one and that was the only one that gave me a tingling sensation. It most definitely dried on my face like a mud mask. I left it on for about 20 minutes, then went to wash it off. Going to wash it off, it was nice and creamy mixed with water, I definitely did like that it came off easier than some other masks. The end results were absolutely the best, I felt that my skin was just rejuvenated, so clean, hydrated, and smooth baby soft. The detox really helped I honestly noticed a difference in my nose and forehead, with blackheads no longer there. The hydration helped with my under eyes and my upper lip. The recharging mask really gave my cheeks a great soothing feel that made them look brighter. Overall this mask was probably my favorite, I definitely will buy again, I would only use the detox and blueberries one again and maybe the coconut one, it just depends. Total Rating: 9.7/10

img-0995.jpg
Okay so overall, I would recommend these masks to anyone, although I would say my first pick is the triple masking kit, then second is the cucumber calming mud mask, and my last pick would be the sheet mask. I enjoyed all masks, but it was a definite close one between the “Triple masking kit” and the “Cucumber calming clay mask”. Just remember to try the mask that best suits you for your skin type or what you feel your in need of. Check out the Yesto website! (not sponsored, I just love their products<3). I hope you liked this post and if you did then please do not forget to like and follow! Also comment down below what mask you would like to try! ⇓ If you enjoyed this post then please subscribe with your email in the sidebar, to be notified of new posts through your email, (be sure to confirm subscription in email) also be sure to follow me on my social media pages, down below! 

xo, Ariana. 💗

Check out my last post: Ten of my Holy-grail Skincare Tips//2018
Connect with me on my social media: Instagram//VSCO//


Ten of my Holy-grail Skincare Tips//2018

Hey guys, sorry I have not posted since Thursday, I was quite busy this weekend and was unsure on what I should post. I am still unsure on what my posting days should be, so let me know what days you want me to post down below! So today’s post will be short and sweet, with ten of my holy grail skin care tips for healthy + clear skin!

  1. Make sure to either wash or clean your face before going to bed: Washing your face before bed is extremely beneficial for clear skin and helps prevent breakouts. By washing your face at night, you remove all the dirt, sebum, and oil on your face from the day. If you have are lazy, use micellar water or toner to at least cleanse the skin.
  2. Always keep your face moisturized: This way your skin gives a youthful glow and keeps it feeling silky. (See Winter Skin Essentials\\\2018)
  3. Drink Water to stay hydrated: Okay honestly, I know many get annoyed when people say to have nice skin is just drink water, but it is so true. Your skin has a pale yellow tone to it when you are dehydrated and your lips are extremely chapped, trust me drinking water will give your face a lively rosy flush to your face.
  4. Do not touch your Face: This is such a big violation in my skin care rules. Touching your face throughout the day will cause breakouts, especially because half the time you have probably touched something very germy and are then going to apply the same bacteria onto your face…. no just please no. If you really need to touch your face, then wash your hands before and then after again.
  5. DO NOT pick at your Pimples: Similarly, to not touching your face comes my next point of avoiding to pop/pick at your pimples! I cannot stress this enough, every time that I have picked at a pimple, it just lead to either more breakouts or scarring so please just resist the urge to pick at it. Now if you do want to pop a pimple, this is the best way to approach it; either using a cotton swab or round, dip rubbing alcohol onto the tip and apply to the problem area. The alcohol will kill the bacteria in the pimple also causing it to deflame the surrounding skin. This always works very well for when I have a stubborn pimple, then I follow it with witch hazel across my face. (I would only recommend trying this for a few stubborn pimples, not all over the face, since the alcohol is harsh and will dry your skin out).
  6. Keep a constant routine: Everyone’s mostly got their own routine, and well of course it’s good to try out new products every so often, but once you find skin products that work for you, keep it a constant routine this way, your skin does not become irritated or breakout when exposed to new products. (Check out my nighttime skin care routine: Nighttime Skin Care Routine 2018 |Cruelty-Free)
  7. Avoid putting your phone against your cheeks: Phones are some of the grossest things we come in contact with daily and when you put it against your cheeks or ear, that spreads the bacteria from your phone onto your face, causing breakouts! Yuck!🤢
  8. Be makeup free at least once a week: If you wear makeup everyday try to take a day off at least once a week to let your skin breathe.
  9. Do a face mask at least once a week: Doing a face mask helps improve the quality of your skin, and if it does not then switch to another mask. So treat your skin to whatever it is lacking, such as moisturization, exfoliation, or a glow!
  10. Make sure to apply SPF to your face: SPF is probably one of the most important things to do to your skin to prevent aging and wrinkles. Protect your skin from the sun and apply some sort of SPF it will help tremendously. So whether your daily moisturizer has it or you need to apply a sunscreen after, just do it to protect your face.

Thank you for reading, I hope this post was very helpful! Comment down below any skin care tips you have other than this!  If you enjoyed this post then please like and subscribe with your email in the sidebar, to be notified of new posts through your email! 

xo, Ariana. 💗

Check out my last post: Beauty + Skincare Haul| Target & Lush
Connect with me on my social media: Instagram//VSCO//