Pride Makeup Look 2018/// Cruelty-free

Hello everyone, I know it’s been awhile since my last post, and I apologize for being so inactive. Last week I started work again (I work as a swim instructor at a local pool), and then some other things came up and because everything was so new again, I did not know how to balance my week out, anyways I hope to get back into my routine of posting at least twice a week.

I hope you all are doing well, and since I have hardly posted this month, I just wanted to wish everyone a very happy Pride Month! For those of you who do not know, June is known as Pride month for all those who identify as LGBTQ+, and today I am showing my support for the community and well of course celebrating Pride! I’ve been wanting to do a Pride rainbow makeup look for quite awhile and since throughout the month of June, Pride fests and parades are happening all over the world, I thought I’d show you one makeup look to try out. I will be attending Chicago’s Pride Parade this upcoming weekend, and I’m planning to complete this same makeup the day of. Anyways I hope you all enjoy this look and maybe even try it out for yourself.

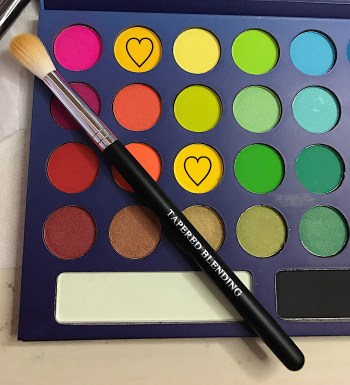
Starting off with the eyes of course, since it happens to be the main action of our look. I decided to mimic the Pride flag on my eyes, a rainbow transition from red, orange, and yellow on one eye and on the other, green, blue, and purple. For today’s look, I used the BH Cosmetics “Take me to Brazil” Palette and the Nyx Ultimate Eyeshadow Palette in “Brights”. I used a few different brushes, that I will mention in the process of this look.

Before starting this eye look, I did apply the Urban Decay Skin Concealer onto my eyelids using my Beauty Blender, and then setting my eyes with the shade “Peach Butter” from the Too Faced Peachy Mattes Palette, (You can use any light neutral shade).

The first color I begun with was the yellow color, I started off towards the inner corner of my eyes, building it into my crease. I used a mix of the two yellow shades in the TMTB palette, using a “Beau Gachis Tapered Blending Brush” that I received in my Ipsy bag a few months ago. (I probably had the most trouble with the yellow, the pigment really was not showing up for some reason, which why it took me a little longer).

IMG-6784.JPG

The following color was the Orange that I used on the center of my lid, I used a blend of the orange from the TMTB palette and then the tangerine shade in the Nyx palette. To apply the orange, I used an It Cosmetics shadow brush, this is really good for picking up color. (Orange was the other color I struggled with for some reason, hopefully when I do this makeup look again, the color is more pigmented).

IMG-6790IMG-6791

The last color used on this eye, was the Bright Red. This is where the pigmented really started to show up. There is only one matte Red shade in the TMTB palette, and to apply the color onto the outer corner of my eyes/crease, I happened to use the “It Cosmetics Precision Shadow Brush”, another brush I adore.

IMG-6785

Once I had gotten all three colors onto my eye, I then blended them with the “BH Cosmetics V5 blending brush” to make sure that there was not any harsh lines and to give it an ombre effect. I also wanted to mention that if I use a repeated brush, I do clean it with the Vera Merona Mini Color Switch, to remove any of the previous colors.

IMG-6776

Next up is my other eye, which holds the other three colors of the Pride flag. I went ahead with the Green first, starting in the inner corner of my left eye working it into the crease. The first green was from the TMTB palette and then the darker green was from the Nyx palette to begin the transition for the blue. To apply the green colors, I used this thin brush that I also received in my Ipsy bag a few months back, by SL Miss Glam.

IMG-6787IMG-6788

With my blue shades, I used the same brush when I did the Orange. I decided to start off with a turquoise like blue and then darken it up with a midnight blue color, as it would be transitioning to the purple.

IMG-6786

Lastly, for my purple color, I kept it pretty simple and only used one color. Using my Wet n’ Wild Large Eyeshadow Brush. To compact and slightly smoke out the color.

IMG-6789

IMG-6794

That completes my eyeshadow look, and now onto the glitter magic. (I finished the rest of my face makeup before starting on the glitter). For highlight, I used the cream highlight stick by Milk Makeup in Techno, I know they were promoting this for Pride Month, so I am unsure if this is sold only for a limited time. Next, I applied the Nyx Glitter Primer with a little precise brush by Real Techniques, where I decided to primarily focus on the highs of my cheekbones. I applied the Nyx Crystal Glitter with the same brush and just compacted a bit onto the primer. I decided to keep it to a crescent shape.

IMG-6774

Once I was done applying the glitter to both sides of my cheekbones, I finished off by highlighting areas of my face with the shadeChehoo” from the Babe in Paradise Palette.


IMG-6777

That completes the final Pride Makeup look. I am no MUA, but I was happy with the way everything turned out. I do hope that the colors come out more pigmented on the day of the Pride Parade and I will also be applying more Glitter than I did here. Hopefully you all enjoyed, and happy Pride! 🌈 I also wanted to say thank you to everyone who follows my blog, I hit 200+ followers!

If you enjoyed this post then do not forget to like it and please subscribe with your email in the sidebar, to be notified of new posts through your email, (be sure to confirm subscription in email). Also make sure to follow me on my social media pages down below, I will follow back all other fellow bloggers!

remember love always wins, ariana. 🌈 ♡🌈 

Check out my last post: Smashbook with me: Seattle Edition!
Connect with me on my social media: Instagram//Facebook//VSCO//Poshmark//Buy Me A Coffee//


Spring DIY Projects///2018

Hi everyone, I am finally getting around to my Spring DIY projects post! I worked really hard on making these diy’s so I hope you all love them. I also thought it would be fun to show you all a time lapse of my process making these diy’s, hopefully the videos turned out well (this is my first time, lol). These projects are very inexpensive and super cute, not much is required, and they are not difficult at all. There are a perfect way to spring up your living space this Spring/Summer. Without further or do, let’s jump into the fun.

Cute Succulent Plant Pots

Materials Needed:

  • Terra cotta pots (2)
  • Succulents or plants of your choice
  • Martha Stewart Metallic Gold Paint
  • Patio paint in the color of your choice (Blue Bahama)
  • Foam Brush/Paint brush
  • Painter’s tape
  • Newspaper
  • Stones or pebbles for planting

Instructions for Painting Pots:

  1. Start by pouring the color paint of your choice to paint your first coat on your pot. (I used a foam brush first, however I switched to a regular brush after the foam brush was not giving the pot full paint coverage.
  2. After painting about 2 coats, you want to set aside your pots to air dry for awhile, about 20-30 minutes.  
  3. Begin choosing your design, I highly recommend Pinterest for ideas! (I first tried to complete a gold triangle on on side, however when I put the masking tape on, it was not fully dried and chipped off a bit of paint. So I improvised and just used two index cards to create a sleek triangle look.)
  4. Take the second color of your choice, in this case it was gold for me. I just began painting the triangle area until coated. (This paint was not as full coverage as I expected, however I did end up liking the marbleized look it gave the pot.)
  5. For your second pot, repeat steps 1-3, either making the same design as the other or choosing a different style. (I first did polka-dots, but I did not like it as much, so I then painted it silver, adding a gold triangle pattern on the rim of the pot.)
  6. Let them fully dry for about a day, resisting any moisture. Then on the following day you may begin to plant them.

Instructions on Planting Succulents:

  1. Once both your pots have completely dried, you can begin to plant them. Start of by pouring in about half an inch of your pebbles into the pot.
  2. Then  take out your succulent (I recommend it to be pre-planted in which most come in, so that you don’t need other soil).
  3. Once I place my plant inside, I spray some water to moisten the soil a bit, pushing down the soil all round the sides to elevate it a bit.
  4. I go in with another few sprays of water to hydrate the soil since it was dry.
  5. Once I get the plant into a straight-up position, I put the black stones all around near the top to equal out the soil level, (the pebbles are good for soil drainage since the roots of succulents do not to well in water).
  6. Lastly, spray your plants with a few squirts of water to hydrate them one last time. (Succulents really should only be watered once a week or once they are dry to the touch).
Error
This video doesn’t exist

Processed with VSCO with f1 preset

Easy Spring Flower Wreath

Materials Needed:

  • Grapevine Wreath
  • Faux Flowers (of your choice)
  • Glue gun
  • Floral Wire Cutters
  • Twine or string
  • Scissors

Instructions:

  1. Start by collecting the flowers you’re planning on using, then using the floral wire cutters, cut them however short you’d like them.
  2. Gather all your floral pieces, then rearrange them however you’d like on the wreath.
  3. After warming up your hot glue gun, begin to glue either on the floral pieces or the grapevine, then placing your piece down, making sure to apply pressure to the glued area.
  4. Continue to repeat Step 3, until you are satisfied with the way it’s looking.
  5. Lastly, cut a piece of twine, begin wrapping it at the top of the wreath, then hot gluing it down, and then cut another piece repeating the same step, until it is fully covered on top.
  6. Your flower wreath is then ready for display!

Processed with VSCO with f1 preset

Error
This video doesn’t exist

Okay so the next one isn’t necessarily a DIY, however it’s a little area that you can create in your room or living space to bring some relaxing vibes and zen into your life. My zen area happens to be on top of my bookshelf and on it I have various Buddha’s to look for spiritual guidance at times, plants for some freshness, and my cute candle. It’s very simple and does not require too much, make it however you’d like. Down below I will state what I have in my area and where everything is from.

Cute Little Zen Display:

  • Geometric Terrarium- Michael’s Craft Store
  • Pebbles inside terrarium- Michael’s Craft Store
  • Real Succulent Plant- (Any Garden Center/store)
  • Faux Succulent Plant Holder- Michael’s Craft Store
  • Buddha’s-various places/mostly in Chinatown.
  • Small Candle- Anthropologie
  • Ceramic (candle) trays- Little boutique (can be found at Homegoods)

Processed with VSCO with f1 preset

I hope everyone got some great ideas to try for themselves, please tag me on instagram: @girl.who.blogs or let me know if you make any of these DIY’s! Also comment down below which project was your favorite, and do not forget to give this post a like if you’d love to see similar posts in the future! If you enjoyed this post then do not forget to like it and please subscribe with your email in the sidebar, to be notified of new posts through your email, (be sure to confirm subscription in email) also make sure to follow me on my social media pages down below, I will follow back all other bloggers!

much love, Ari. 

Check out my last post: The Sunshine Blogger Award//2018
Connect with me on my social media: Instagram//VSCO//Facebook//Poshmark//


The Sunshine Blogger Award//2018

Hi everyone! I am back with another post today. I am sorry that it’s been a little over a week, I have been again busy with some stuff and I was also running behind on my next blog post, I was going to post it today, however it will be tomorrow! Get excited because the post will be on “Spring DIY Projects”! Anyways, yesterday I was nominated for The Sunshine Blogger Award by the lovely EverythingbyEsther , so thank you very much Esther, and if you’re not already then go check out her wonderful blog! The tag consists of 10 questions and then a little message at the end to all your blog readers, now onto the questions!

  1. Where do you get inspiration from for your blog posts?

I usually get my inspiration from literally so many outlets, sometimes ideas just come to me, Pinterest, I get inspired by other bloggers, and most of the posts that I blog about are posts that I would read or call my attention! Honestly inspiration for posts is everywhere, there is an unlimited amount that you could blog about.

  1. What are your favorite things to do?

Besides Blogging, I really enjoy collaging/diy projects, watching tv (a little too much, but I just love it), exploring no places whether it’s in the city or traveling, and I also love playing with my dog, she is a comfort to me.

  1. What is a Song that holds Sentimental Value to you?

“The Reason by Hoobastank”, I’m not really sure why, but because of its value to me, I forbid myself to listen to it.

  1. A few things you’re grateful for right now?

I am grateful for a lot of things of course the simple values of life (family, food, a home, etc.), but also my therapist, my blog, my blog supporters, and the many opportunities that are given to me in life.

  1. Do you prefer a large family or a smaller one?

I have a large extended family which I like, however for my household family, I prefer a smaller one.

  1. If you had the opportunity to either Go Back In Time or See the Future, which would you do and why?

Without a doubt, I would go back in time to relive some of my best moments in life. I’m a very nostalgic person and would definitely take the chance to experience those moments at least one more time. I would also change some things to prevent them for happening in the future.

  1. Who’s your mentor?

I am not sure if I necessarily have one right now, I have people who I of course look up to, but not a mentor.

  1. What is the most recent milestone in your life (it does not have to be blog related)?

Mine happens to be blog related, because I recently hit 100 blog followers, not including email subscribers. I am so thankful for everyone who follows, supports, reads my blog!

  1. Introvert or extrovert?

I would definitely say that I am an introvert, through and through, I’m very awkward which is something I hate, but I really cannot change it. I used to be an extroverted introvert, meaning that with people I was close too I was very open and comfortable, however things have changed.

  1. A few of your favorite movies? Why do you love them?

My all-time favorite movie is The Perks of Being a Wallflower, I endlessly love that movie, it’s very emotional and although I cry every time, there is just something about the movie that I feel this personal connection. A favorite comedy movie of mine is She’s the Man, it’s so funny and pretty much iconic. I also really love Disney movies and Studio Ghibli films because they are my childhood and super cute, but overall there’s way too many movies to name that are my favorites.

  1. Please offer a word of encouragement to your readers.

You can get through difficult times. For the longest time I felt in a rut and that I could not get through something, and even though I am not completely through with this difficult time, I got through some of the obstacles that felt like they held me back forever. I still try to tell myself that it will soon be through, just remember that when you feel like you cannot get through a hard time, you will, there will be light in the end of the tunnel.

Questions to all the Nominees: 

  1. Where do you get inspiration from for your blog posts?
  2. What are your favorite things to do?
  3. What is a Song that holds Sentimental Value to you?
  4. A few things you’re grateful for right now?
  5. Do you prefer a large family or a smaller one?
  6. If you had the opportunity to either Go Back In Time or See the Future, which would you do and why?
  7. Who’s your mentor?
  8. What is the most recent milestone in your life (it does not have to be blog related)?
  9. Introvert or extrovert?
  10. A few of your favorite movies? Why do you love them?
  11. Please offer a word of encouragement to your readers.

My Nominees:

If I did not tag you and you are interested please feel free to do this post and tag me so I can check it out! I hope you all enjoyed this post and I will see you guys soon!

If you enjoyed this post then do not forget to like it and please subscribe with your email in the sidebar, to be notified of new posts through your email, (be sure to confirm subscription in email) also make sure to follow me on my social media pages down below, I will follow back all other bloggers!

– Ariana. 

Check out my last post: Spring Break Ideas To Do if You’re not Traveling | 2018
Connect with me on my social media: Instagram//VSCO//Facebook//Poshmark//